UH Biocomputation Group
Introduction
This purpose of this page is to aid non admin users request updates to the UHBiocomputation website. There is a different SOP document for admins. The website is generated using a Python tool called Pelican which converts the source files into HTML files with the required template design and so on. The sources are kept in the Github repository so that:
- They are backed up.
- Any errors can be easily rolled back.
- They are easily accessible to anyone that may need to modify them.
- Non administrators that would like to make modifications can make them without the admins having to actively do all the work.
Since Pelican is written in Python, it can be installed on all operating systems. It is easiest on Linux where it can generally be installed using the distribution's package manager:
$ sudo dnf install python-pelican #On Fedora
$ sudo apt-get install pelican #On Ubuntu variants
If it isn't available on one's platform, it can be installed using the pip utility:
$ pip install pelican #If unavailable using the package manager
More information on installing Pelican can be found here.
You will also need Git installed to get the sources. On Linux variants, Git is available using the default package managers.
$ sudo dnf install git-all #On Fedora
$ sudo apt-get install git #On Ubuntu variants.
Git can also be installed on Windows and Mac systems using the installers available here. The default Git installation provides gitk, but there are other graphical clients available for install too.
The sources are plain text files which can be either written in markdown or restructured text using one's favourite text editor on one's favourite operating system.
There are three simple steps required to make updates to the website:
- Fork the sources and make the changes.
- Preview, confirm and commit.
- Open a pull request on Github.
The admins will then review the pull request, merge it and republish the website with the new changes as explained in the SOP document for admins.
Fork the sources and make the changes
Since non admins do not have write access to the repository, they must fork the repository on Github before proceeding. One must be signed in to Github to fork a repository. Once signed in, one can navigate to the repository they intend to fork and click on the fork button in the top right corner as shown in the image below:

Once the fork is complete, one will have a copy of the repository under one's username, as shown in the image below:

To make changes, this forked copy of the repository must be cloned. The repository's clone URL is generally in the right hand sidebar of the main page.
$ git clone --recursive git@github.com:USERNAME/UH-biocomputation-web.git #replace username with your username
The recursive flag is required so that one also clone the pelican-plugins submodule. If one has already forked the repository earlier, one should make sure it is in sync with the main repository since the main repository may have changed since the original fork was made:
$ cd ~/website #wherever the clone resides
$ git remote add upstream git@github.com:UHBiocomputation/UH-biocomputation-web.git #Add the main repository as a remote
$ git pull upstream master #Pull changes from the main repository
$ git push origin master #Update the fork
$ git checkout -b mynewbranch #Use a different branch so that the master branch remains clean
Note: A shortcut is to delete the old fork and fork the repository again - fresh forks are always up to date.
The directory structure of the sources is as follows:
[asinha@ankur  UH-biocomputation-web(master %=)]$ tree -d -L 2
.
├── content
│   ├── files
│   ├── images
│   └── pages
├── output
├── pelican-plugins
└── pelican-theme-gum
    ├── static
    └── templates
- All the source files are stored in the content directory. Posts in Pelican are divided into two categories: blogs and static pages. All the pages in the site header are static pages. These reside in content/pages. The posts that make up the "news" section are blog posts and go straight in the content directory. Various images and files that are linked to in either pages or posts go into their respective folders.
- The generated output files go in the output directory. The contents of this directory are then uploaded to our hosting webspace and constitute the actual website.
- The pelican-theme-gum directory holds the theme template and css files for the site. Again, unless tinkering with the theme, one need not touch this directory at all.
- The pelican-plugins directory is a git repository in itself. Most of the time, one will not deal with this directory at all. We only use the tag_cloud plugin. The commands mentioned enough will correctly clone this directory.
Once one has cloned the repository, they make changes and save them. Note: Changes can be made to files using the Github web interface also. However, to run Pelican and preview changes, the sources must be downloaded anyway.
Preview, confirm and commit
The Pelican Makefile has the commands required to preview and publish the website.
Once the required changes have been made and the file saved, preview the website to confirm that everything works as expected. To do this, in the main directory where the Makefile resides, run:
$ make html
Pelican /home/asinha/Documents/02_Code/00_repos/others/UHBiocomputation/UH-biocomputation-web/content -o /home/asinha/Documents/02_Code/00_repos/others/UHBiocomputation/UH-biocomputation-web/output -s /home/asinha/Documents/02_Code/00_repos/others/UHBiocomputation/UH-biocomputation-web/pelicanconf.py
Done: Processed 4 articles, 0 drafts, 5 pages and 7 hidden pages in 1.04 seconds.
If this command completes without errors, preview the website:
$ make serve
This sets up a local server that serves the website at localhost:8000 so that the changes can be previewed. To stop this server, hit Ctrl + C. If everything is OK, the changes can be committed:
$ git add .
$ git commit -m "A sensible commit message."
$ git push -u origin mynewbranch
Open a pull request on Github.
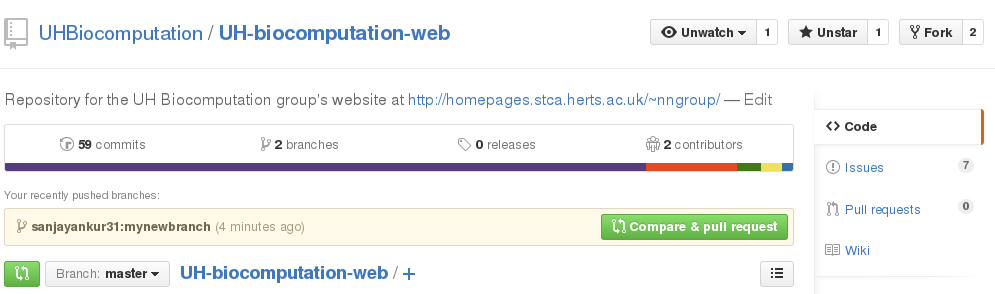
Once the changes have been pushed to one's fork, navigate to the main repository. Github will detect that the fork has extra commits and ask if pull request needs to be opened, as shown in the image below:
When the button is clicked, it'll navigate to the next page where details on the pull request can be provided:
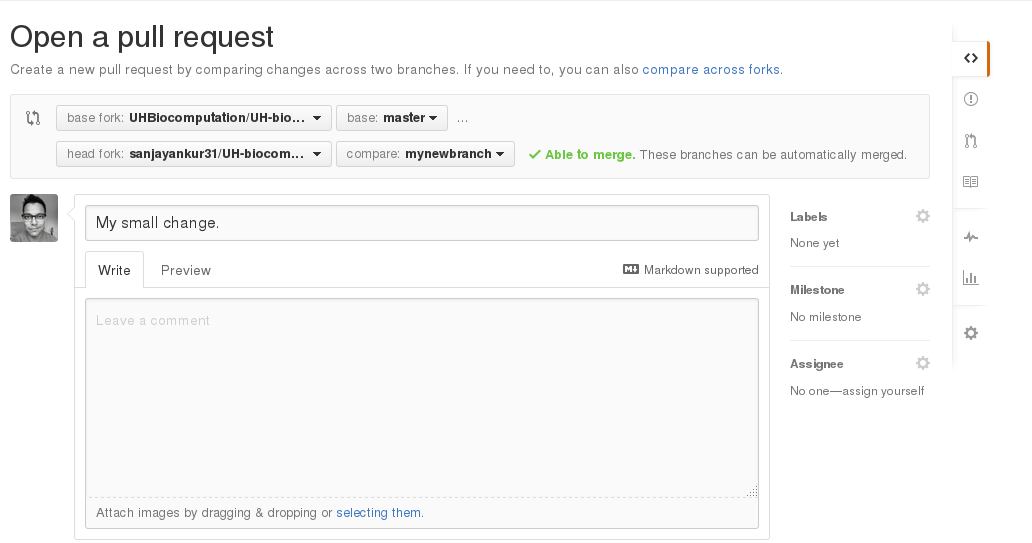
Here, as expected, the main repository is the base fork, while one's personal fork is the head fork. At the bottom of the page, which is not shown in the image above, it will also show what changes have been made. Please ensure that the "Able to merge" message appears here - if it does not, please contact one of the admins - merging would result in a conflict.
When satisfied with the request, click the "Open pull request" button. That's all! An admin will review it and merge the request if it's OK.